When Lansweeper is installed, it will automatically install a self-signed SSL certificate for when users want to use HTTPS initially. You can find this pre-installed Lansweeper certificate under Program Files (x86)\Lansweeper\IISexpress\Certificate and it is only there to serve as an example.
To enable SSL in Lansweeper with your own certificate, you can follow these instructions:
Configuring SSL in IIS Express
Configuring SSL in IIS
Should you still face issues after following the above-mentioned KB articles, do the following:
- Open the Start menu on your Lansweeper server, select Run and run MMC as administrator.
- The Microsoft Management Console will open.
- In the File menu, select Add/Remove Snap-in.
- Select Certificates and hit Add.
- Select Computer Account in the resulting popup.
- Select Local Computer.
- Hit Finish and then Ok.
- Select Add/Remove Snap-in again in the File menu.
- Select Certificates and hit Add.
- Select My User Account in the resulting popup.
- Hit Finish and then Ok.
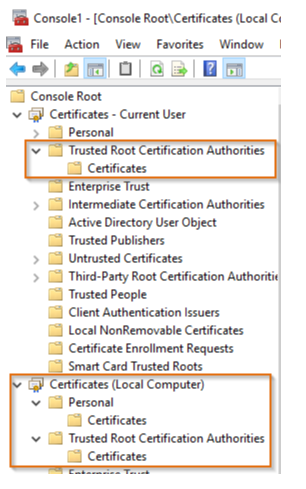
- Browse to Console Root\Certificates... Ensure your certificate is present in all of the following stores:
- Current User > ... > Personal
- Current User > ... > Trusted Root Certification Authorities
- Local Computer > ... > Personal
- Local Computer > ... > Trusted Root Certification Authorities
- If your certificate is missing from any of these, please add it:
- In the console tree, click the logical store where you want to import the certificate.
- Right-click the Certificates folder and select All Tasks\Import.
- Select your .pfx certificate file, submit your password and continue until the import is completed.
- Restart the IIS Express service on your Lansweeper server.
More information on using the mmc tool to manage certificates and importing certificates:
Add the Certificates Snap-in to an MMC
Import a Certificate

